Since going vegetarian for 95% of my meals about 10 months ago (the beef jerky I've been eating the past couple days doesn't count!), one of the things I miss most is a nice juicy pork chop. Pork chops are one of my husband's favorite, too, so he is always happy when he sees or smells them cooking. His favorite is my corn flake crusted baked chops, but last night's went down pretty well! I had my tofu and tried to get him to eat some of it, but he won't do it. Silly boy:) Also listed is my recipe for tomato and nopales (cactus) patties.
What you will need:
Bone in thin pork chops (for however many people)
Soy oil (about 1/4 cup per chop)
Mrs. Dash Onion and Herb no salt no msg seasoning (2 tsp per chop)
Salt (optional: 1/4 tsp per two chops. I don't use any salt in this)
Mix the soy oil and seasoning (and salt if using) in an appropriate sized bowl that will allow all the chops to sit in the marinade. Place the chops in the oil mix and place in the refrigerator for 1 hour. After an hour, take the bowl out, flip the chops, and place back in the refrigerator for another hour. (Chops on right, my tofu on left)
When chops are finished marinating for the two hours, remove from the refrigerator and prepare them for baking. Preheat the oven to 400 degrees. Heat a nonstick skillet over medium high heat. Take the chops one by one and sear them in the pan...about 10 seconds on each side, until lightly grayed.
Once seared, place on baking sheet that has been sprayed with nonstick spray (I always line mine with foil to make cleanup easier!). Place in the oven and cook for 15 to 20 minutes depending on the thickness of the chops. Check the temperature around 12 minutes, then cook to 155 degrees. (Again, my tofu on the left)
For the tomato and nopales patties (for 2 to 3 people):
8oz stewed tomatoes in their own juice
8oz freshly strained cubed or diced nopales (or you can use frozen prepared nopales)
1 package of Ritz crackers (original Ritz gives a nice buttery flavor, but you can use wheat, too)
*nopales = cactus pads*
Cook the stewed tomatoes and nopales for a few minutes with a pinch of salt until the nopales are tender. Remove from heat and let cool for about 5 minutes.
While the tomato mixture is cooling crush or blend the Ritz. Pulse in a food processor until bread crumb consistency. You could also put the Ritz in a Ziplock bag, seal, and then crush with a rolling pin.
Once the Ritz are blended and the tomato mixture has cooled a little, pour the Ritz into the mixture and stir until combined.
Heat a nonstick pan over medium heat then spray with a little cooking spray. Spoon a couple TBS of the tomato mixture into the center of the pan and press down with the back of the spoon to form a small patty. Allow the patty to cook for a couple minutes, then flip the patty and cook the other side for a couple minutes. You want both sides to be browned and somewhat crispy!
I served the chops and tomato patties with a spinach and cheese tortellini in a homemade buttered tomato sauce. There were two chops on the plate, but I forgot to take the pic until after my husband had already eaten one of them:) He has little patience when it comes to his meat!
Thursday, June 30, 2011
Sunday, June 26, 2011
Cream Cheese Peach Pie
I have been on a pie kick lately. As much as I love chocolate cream pie, vanilla wafer pudding pie, and mousse pie, I have been making pies that are a little "healthier." Well, as healthy as a pie can be, I guess! You know, less sugar and fresh fruit:) We got fresh peaches from the store this morning and peach pie sounded so good, so I made some.
You will need:
1 ready made graham cracker pie crust
8 oz light cream cheese
1 egg
1/3 cup sugar + 1 1/2 tsp
1 tsp vanilla
3 medium sized peaches
1 1/2 tsp cinnamon
*if you want soft peaches in your
pie, use canned peaches instead of fresh*
Preheat oven to 375 degrees.
For the base, mix the cream cheese, egg, 1/3 cup sugar, and vanilla. Once mixed well, pour into the pie crust.
Slice the peaches off the pit, then cut the slices into bite sized pieces. You can peel the skin off if you want to. I don't, though.
Put the peaches on the cream cheese mixture in the pie crust and kind of press down so that most of the peaches kind of sink into the mixture...leaving some exposed on top. Mix the 1 1/2 tsp sugar and the cinnamon together and then sprinkle over the peaches.
Place in the oven and bake for 25 minutes. When ready, remove from the oven and place in the refrigerator to chill. Once chilled (about 3 hours) cut and serve! It's good with fresh strawberries!
Friday, June 24, 2011
Garlic and Lime Buttered Tilapia
Tilapia is a great fish...especially for those people who don't like fish, like me! The following is a very simple and fast way to bake tilapia with a slightly limy and buttery flavor. ***Hint...soaking the tilapia filets in plain yougurt, buttermilk, mayo/milk mixture, or milk/lime mixture for at least 4 hours will take away most of the fishy flavor and smell.***
For 3 tilapia filets:
2 1/2 to 3 TBS butter
PLUS
1 tsp salt
1 tsp garlic powder (or 2 freshly minced cloves)
1 tsp chili powder (like paprika or cayenne)
1 TBS fresh lime juice (about 1/2 a lime)
OR
1 TBS salt with lime and chili
1 tsp garlic powder (or 2 freshly minced cloves)
Preheat oven to 350 degrees. Melt the butter in a saucepan over medium low heat. Once melted, add all of the seasonings and stir to mix well...only takes a minute!
When the butter mixture is ready, pour a little into the bottom of a baking dish (I use a casserole dish). Place the tilapia filets in the dish, then pour the rest of the butter mixture over the fish.
Place in the oven and bake for about 15 minutes, until it flakes easily with fork (temp of about 155 degrees).
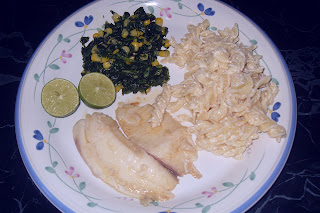
Serve with a rice or pasta of your choice and green veggies. I served it with onion cream cheese pasta and sauteed spinach with corn.
Easy as that! And you can cook the pasta while the fish bakes (rice may need to be started before you start the fish), and steam or saute veggies, too. Dinner in under 30 minutes:)
Thursday, June 23, 2011
Cinnamon Swirl Bread
Bread...bread...B-R-E-A-D bread! Salty, buttery, sweet. All of them are yum yum yum:) My husband is a bread FANATIC. Really! He will eat bread for breakfast, bread as a snack, and bread right before bed. No exaggeration...he does eat that much bread. Mostly it's sweet bread, but he prefers sweet bread that is not too sweet, so, for him, I made a cinnamon swirl bread. Just a little sweet:)
You need:
3/4 cup water (hot, but not boiling) + 1 TBS room temperature
1/4 cup honey + 2 TBS
3/4 tsp active yeast
2 eggs (1 egg, yolk and white separated)
1/8 cup oil
1/2 tsp salt
2 1/2 cups flour + extra for kneading and dusting
1/4 cup cinnamon
1/2 cup granulated sugar
In an appropriate sized bowl mix the hot water, yeast, and 2 TBS of honey. Mix well and let stand for about 10 minutes until foamy.
While the yeast/water mixture is foaming, get the 2 1/2 cups flour, salt, 1 egg and one egg white, and oil ready. When the yeast/water mixture is ready, mix it with the readied flour and other previously listed ingredients to form a workable dough. Once mixed, turn dough out onto lightly floured surface and knead until fully combined (add flour a little at a time if the dough is sticky).
When kneaded, put the dough ball back into the bowl, dust with a little flour, and cover with plastic wrap. Let the dough sit for 2 to 3 hours...until it doubles in size.
When the dough had risen, remove the dough from the bowl and punch it down. I mean really PUNCH it down. Then fold it and put back in the bowl to rise again for about an hour.
Once risen, again, take the dough out of the bowl and knead a few times. Preheat oven to 350 degrees. Use a rolling pin to flatten out the dough into a fairly wide rectangle.
Once rolled out, warm the honey until "watery," then pour the honey over the dough. Smooth honey over the dough, then mix the cinnamon and sugar and sprinkle evenly over the honey. Let it rest for about 5 minutes to let the honey thicken a little, then roll the dough to form a log, slightly pinching the ends together to avoid honey leakage.
Prepare a 10" X 5" loaf pan (can be slightly varied in size) by spraying with cooking spray and sprinkling a LIGHT layer of flour so the bread does not stick to the pan.
Place the rolled loaf into the pan, seam side down. In a small bowl, mix the extra egg yolk and 1 TBS of water and brush a little over the top of the loaf (this part is optional and will add a golden color to the top of the bread). Place in oven and bake for about 40 minutes. When ready, remove from oven, then remove the loaf from the pan and allow the loaf to cool (on a wire rack if available...not necessary). It is important that you allow the loaf to cool completely before slicing. Remember, there's honey in there. The honey needs to cool and set before you cut the loaf, or it will run out and make an oozy mess. It can also burn your skin extremely bad if still hot when cut. It will only take about an hour for the loaf to cool...it's worth the wait:) -My seam broke (happens sometimes) so the loaf isn't as pretty as I would have liked for pics. Sorry.-
Wednesday, June 22, 2011
Squash Blossom Quesadillas
Quesadillas!!! Good for a meal or just a snack. You can make quesadillas with so many different fillings. Most people just know quesadillas as cheese filled tortillas with chicken or beef, but there are so many other things that taste so good with oozy melty cheese and tortillas. One of my favorite additives is spinach, but...tis the season for SQUASH BLOSSOMS!!!
All you need (for 2 to 3 single tortilla quesadillas):
1 bunch squash blossoms -about 15 blossoms-
2 tsp butter
1 pinch salt
2 to 3 tortillas
shredded cheese (mozzarella is best for these)
cooking spray
First thing you need to do is clean the blossoms. Take the stems off the plants...ONLY the stems, not the bulb at the end of the blossom. Once stemmed, place the blossoms in a bowl of water and let them soak for about five minutes.
After the blossoms have soaked and you notice that the water is turning yellowish brown, stick your hands right in there and stir the plants around, "pump" the water, and gently squeeze the plants to try and get as much dirt and debris out of the blossoms. Then take a handful of blossoms and squeeze the water out of them as tightly as you can to get as much water out of them as you can and place them on a clean dry kitchen towel. Repeat until all the blossoms are squeezed. Pat the blossoms dry with the towel.
Now chop the blossoms, bulb and all. Melt the 2 tsp of butter in a nonstick pan and add the chopped blossoms. Sprinkle on the pinch of salt and saute for about 2 to 3 minutes, until the blossoms are wilted and the bulbs are softened slightly.
Turn the heat off when the blossoms are ready and prepare the tortillas. Put some shredded cheese on only half of each tortilla, then top with a couple spoonfuls of the sauteed squash blossoms.
Fold the tortillas in half and spray a flat top grill or nonstick pan with cooking spray and set over medium low heat. Once heated, place the filled tortillas on the flat top, or in the skillet, and let it cook for a couple minutes, until the tortilla is golden and slightly crispy, then flip the tortillas to cook on the other side for a couple minutes.
Once ready, you can eat them whole or cut them in half. Serve with whatever you normally like quesadillas with. Guacamole, sour cream, pico de gallo, lettuce, salsa, etc. I like mine with chopped lettuce, sour cream, and pickled jalapenos! YUM YUM YUM:) Enjoy!
Saturday, June 18, 2011
Ground Meat and Tomato Pasta Sauce
When it comes to ground meat I cook for boys, I prefer to use ground chicken, turkey, or pork. Ground beef if fine, though, for this recipe if that is what you like. Serve over any type of pasta that you want.
You will need:
1 lb ground meat
2 large tomatoes (diced)
1/3 large onion (chopped)
2 cloves of garlic (roasted and freshly pressed)
2 TBS Worcestershire sauce
1/2 tsp salt
1 tsp ground black pepper
16 oz tomato puree
3 TBS butter
3 TBS sour cream
1 TBS dried oregano
Put the meat in a medium sized pot with the worcestershire sauce, salt, and pepper and cook over medium heat until browned, stirring often.
Once meat is browned, pour in the tomatoes, onion, garlic, and tomato puree. Mix well and bring to a slight boil. When it starts to boil, add the butter, sour cream, and oregano and bring back to a boil. Lower the heat so the liquid in the pot is just slightly bubbling and then leave it alone for awhile.
If using "whole" dried oregano, like I do, instead of jarred oregano, you need to be sure to crush it before putting it into the sauce mixture. Simply put the oregano in the palm of one hand then rub your hands together over the pot to somewhat "powder" the oregano.
Let the sauce cook for 30 minutes, stirring it really well about every 5 minutes or so. Serve the sauce over your favorite pasta with a side of steamed vegetables and some garlic bread if you like. My son LOVES when I make pasta and will usually ask for more. This amount of sauce is enough for about 8 to 10 servings depending on the portion sizes, so I freeze what's left for the next time we want pasta:) Just as good reheated!
Subscribe to:
Posts (Atom)