Tuesday, May 31, 2011

Carrot And Zucchini Vegetable Muffins The Kids (and parents) Will Love!

     Zucchini and carrot muffins.  WHAT?  Some people think that vegetables and sweets don't go together...personally, my favorite cake of all time is carrot cake.  I even had carrot cake as my wedding cake!  My son loves it, too, and even stole my last piece out of the refrigerator and ate it before I knew what he was doing:)  He is the reason I started making these vegetable muffins when he was only a year old (a little over 2 years ago).  It has never been a struggle to get him to eat his vegetable, but I wanted to try and get more creative in the way they were served to him.  Sometimes we have zucchini or chayote "pancakes."  Sometimes it's pea and corn stuffed spinach wraps.  My favorite, though, are these muffins.
     One of the things I love about these muffins is...THEY ARE ONLY 150 CALORIES EACH!!!  There is only 1/4 cup of sugar in the entire recipe, which means only 1 tsp per muffin.  They get extra sweetness from the vegetables...especially the carrots.  While they were in the oven today, baking to golden perfection, my son sat in front of the oven waiting for them to finish so he could have one.  They are THAT good.

You will need:
1/3 cup skim milk
1/4 cup vegetable oil (or apple sauce)
1 egg lightly beaten
1 tsp vanilla
2 cups flour (I always use wheat flour)
1/4 cup brown sugar
1 TBS baking powder
1 tsp cinnamon
1/8 tsp nutmeg
3/4 tsp salt
1 1/4 cup shredded carrots
1 1/4 cup shredded zucchini

Preheat your oven to 425 degrees...

In a small bowl, combine egg, milk, oil, and vanilla.  Whisk together until well combined but not frothy.  In a medium bowl, combine all the dry ingredients (flour through salt in above list) and mix well.


Once the dry ingredients are combined, fold in the vegetables, making sure to coat well with the flour mixture.


Once all the vegetables are coated, pour the milk mixture in all at once and stir to combine.  The mixture will be very thick, but that is how it's supposed to be!  When everything is all combined, line muffin tins with muffin liners, or lightly spray with cooking spray then sprinkle with flour so the batter doesn't stick and/or burn.  Spoon the batter into the muffin tins until almost full.


Bake at 425 degrees for 20 to 25 minutes (until an inserted toothpick comes out clean).

     Once the muffins are finished baking and are a golden brown, remove the muffin tin from the oven and allow the muffins to cool for just a few minutes.  After a few minutes, remove the muffins from the tin and transfer them to a wire rack to cool completely.
     As I mentioned before, these muffins are not really sweet, but have an incredible flavor to them.  If you would like a little more sweetness to them you can sprinkle some sugar on the tops right before baking.  My favorite way to sweeten them up a bit, though, is to add a little bit of honey to one right before I eat it...on top or sliced and smeared in the middle:)

Monday, May 30, 2011

Las Cazuelas

The town where I live in Mexico (Comonfort, GTO) is pretty small, and I am the only gringa who lives here. There are less than 68,000 people in the 485.90 square kilometers that make up this town.  There are a couple of little restaurants that I like, but one in particular that is my favorite.


This little restaurant only has 8 tables and is run out of the lower half of the owners house.  Elsa.  Elsa is one of the sweetest ladies I have met and Benjamin (my son) always runs in and gives her a huge hug whenever we get there. 


You can see her husband sitting at a table in the back right corner.  He is really sweet, too, and always has good conversations with my husband when we are there.  He is the "money" man and always gets the drink orders whenever customers come in.  He just had some health issues having to do with diabetes, but is now on the fast track to recovery:)


Anyway...the inside of the restaurant is quaint and has plastic tables and chairs, as most of the "house" restaurants and stands do.  They have table umbrellas for most of the tables.  Mostly for decor, but also for shade during the earlier part of the day since the ceiling is a Plexiglas type of material and lets in the sun.  All the tables have placemats and two cute little wine bottles on them.  Some have table cloths, others don't.  There is one long table set up for larger groups or families that come in.  It is situated on a level that is a step higher than the rest of the place.


 There are many wonderful dishes on the menu, but Elsa usually has on "off the menu" item that my husband usually gets.  Tonight was chicken mole, one of my husbands favorite dishes.  I think that is what he gets every time she has it.  The mole sauce usually has a pretty good kick to it, and the texture is always mole perfect!  When I ate meat, mole was a nice escape from the usual chicken dishes, and sometimes I miss it.  It is a messy dish, but well worth the it:)


I use to love her Milanesa.  That is a very thin pan fried piece of chicken.  She also makes a wonderful Cordon Bleu that melts in your mouth and has the best aroma.  Since my appetite for land creatures has dwindled significantly in the past 8 months, I only eat meat (only white meat, never red) once every couple of weeks.  I am now absolutely in love with her Camarones Empanizados (fried shrimp).  She makes this wonderful breading that has poppy seeds in it and slowly pan fries the baby shrimp.  The dish is supposed to come with rice and beans, but I get a special plate...because Elsa is so wonderful and caters to my needs and wants.  I get it with rice and shredded lettuce, and vegetables if she has them (most restaurants like this do not have vegetables except for pico de gallo or onions and tomatoes).  She also put some fried potatoes on my plate, which looked amazing, but I did not eat for two reasons.  One, that was just another starch I did not need in addition to the rice, and two, they had pork mixed in with them.  The plate looked gorgeous and the food was delicious!!!


My son loves her chicken burritos which are made with shredded chicken and refried beans, but he is also a huge fan of quesadillas.  Especially Sincronizadas.  Sincronizadas are a special kind of quesadilla which has a little bit of mayonnaise on the inside of the tortillas and are layered with ham and queso Oaxaca.  Sometimes he will eat the entire quesadilla, but most of the time he takes them apart and just eats the goodness inside.  Either way, he's always happy when he sees Elsa walking over to the table with his food:)

 
Overall, I give Las Cazuelas a 10 out of 10.  We never all get our food at the same time, and the seating is not the most comfortable, but Elsa makes our visit special every time we go...which is usually every couple of weeks.  My son will also tell us sometimes, "I wanna go see Elsa!"  When you find a little gem like this cozy little restaurant, and your 3 year old likes it, you take advantage of it whenever you can:)  I am so glad we found this place when we first moved here almost 4 years ago. 

Sunday, May 29, 2011

Eggsplosion!!!

I loooove me some good breakfast food.  Especially a good egg meal!  I have eggs for breakfast at least 5 times a week.  Most of the time it is just egg whites...or 1 yolk and 2 whites...so my cholesterol doesn't get out of control.  There are some recipes, though, that just require the whole of both eggs:)  This is one of them.  And this recipe has one of my other favorite foods...CHEESE.  Glorious, gooey, flavorful, sent from the gods CHEESE!

I give you:

THE EGGSPLOSION GRILLED CHEESE
What you will need:
2 pieces of sandwich bread (I only use wheat or multigrain, but any kind is fine)
2 eggs
1 1/2 TBS butter or margarine
3 oz shredded cheese (or 3 slices of cheese)
Salt for seasoning
Chili powder (optional, but I always use it)
Large mouthed shot glass or small jar lid
Spatula (the thinner, the better.  A cookie spatula works best)
Flat top grill (which is what I use), nonstick pan, or cast iron pan

1) Start by heating your pan or flat top on low-medium heat for about 3 or 4 minutes.
2) While that is heating up, you can cut the centers out of each piece of bread with your "circle" of choice.

3) When the centers are cut out and your pan/flat top is heated, put 1 TBL of butter in it to melt, then add the slices of bread...and the cutouts for a special little treat:)

4) Let the bread get to a very light golden brown on the bottoms, then crack an egg in the center of each slice, then season with salt (and chili powder if desired!).

5) Let the egg cook just enough that you can easily pick up the slice of bread with your thin spatula without the egg falling out of the bottom.  This will take about a minute and a half to two minutes depending on the heat.
6) Once ready, very carefully flip the slices of bread over (including the little circle cutouts) being careful not to let the egg yolk fall too out of place!

7) Add the cheese to the top of all the bread.  If using slices, add 1 slice to each slice of bread and half of the third slice to each circle cutout.  If using shredded, 1 oz per slice of bread, and a half oz per cutout.

8) Once the bread has browned slightly and the egg is just barely cooked enough that you can slide the spatula under it (about two minutes at the most), put one slice of bread on top of the other, cheese sides together (and don't forget those cutouts).  Cook the sandwich for a minute or two, then flip and cook the other side.  Hint: if you don't want a really runny egg, cook for an extra minute or two on each side.


9) Remove from heat and let rest for about a minute.  You can slice it or eat it as is.  Use your hands or a fork and knife. Any way, it's pure yumminess!!!

And my son LOVES when I make this for myself because he gets the cutout grilled cheese part:)


EXTRAS...I have also added extras to this sandwich, depending on my mood.
1) I like adding a thin slice of tomato to each slice of bread right after putting the cheese on.
2) Sliced grilled zucchini is also really good added when the cheese is added.
3) Caramelize about 2 TBS of chopped onion and use that butter to cook the bread and put the onion on when you add the cheese.
4) If you want meat, you can add bacon (turkey or pork), ham (turkey or pork), or even some thin sliced steak.  I don't eat red meat and only eat other meat once every couple of weeks, so I actually add "fried" tofu sometimes!
Be creative and make it your own. 


Saturday, May 28, 2011

Onion Hinted Pizza Dough


I love pizza...but I really love making my own pizza at home because I can make it with whatever "abnormal" toppings I want it!  I also like being able to flavor the dough any way I want.  I have several recipes for pizza dough, but the following seems to be my husband's favorite, so I thought I would post the Onion Hinted Dough recipe as my first for pizza entries:)  It is simple and takes less than hour from no dough to done pizza!

What you will need:

 2 Cups flour, plus a little extra for rolling (I use wheat flour)
4 grams (.125oz) of yeast
1 1/2 TBS onion powder
2 tsp garlic powder
1tsp each of salt and black pepper
6 oz warmed milk (~110 degrees)
2 oz warmed water (~110 degrees)

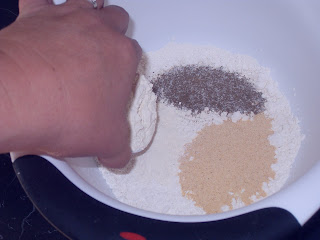
1) Mix together all the dry ingredients excluding the yeast. I usually use a whisk, but a fork or spoon will do just as well.

2) In a separate bowl pour the yeast into the warmed milk and water and mix well with a whisk until fragrant (about 1 minute).

3) Make a "bowl" in the center of the dry ingredients and pour liquid mixture in, then fold ingredients together with fork or wooden spoon.

4) Once dry ingredients are incorporated slightly by using utensil, use one hand to finish mixing.  Dough should be a little moist, but not sticky.

 5) Form dough into a ball and set in the center of the bowl.

6) Cover the bowl with a clean kitchen towel and let sit for 25 minutes.
7) Preheat oven to 400 degrees while dough is resting.
8)  Once dough has rested, lightly flour a large flat surface for kneading and shaping the dough.  Knead dough about 7 or 8 times until workable.

 9) Shape dough to desired shape and thickness.  I usually do a rectangle and make it fairly thin.  I also like to add a "lip" to the outer part of the dough, as shown below.

10) Place dough on pizza pan if you have one, or on the bottom back of a cookie sheet covered with foil like I do.  Spray the pan or foil lightly with cooking spray first.  Once dough is in place, spray top of dough with cooking spray as well.  This helps the tomato sauce from seeping into the dough.

11) Put tomato sauce of your choice on the dough. I always use homemade sauce.  A VERY simple homemade sauce is to mix 7 to 8 ounces of tomato puree, 2 tsp dried oregano, and 2 tsp dried thyme.

12) Top with desired yummies.  Today I chose shredded mixed cheese with turkey ham for my son and freshly sliced zucchini for me!

13) Place in oven and bake for 15 to 20 minutes depending on thickness of dough.  Take out and ENJOY!!!

I will add different flavored dough recipes later on. 
If you have any recipes you would like, please let me know and I will add them as soon as I can!

Friday, May 27, 2011

Dress it up

     An old friend of mine suggested that I start a blog with my recipes.  I love to cook, and with a 3 year old son, a carnivorous husband, and a mostly vegetarian me, I am sometimes cooking 2 or 3 different plates for meals.  I cook very little red meat for my men and prefer to feed them healthier versions of "every day" food.  I buy sliced turkey instead of ham for sandwiches, ground pork, chicken, or turkey instead of ground beef, and use low sodium or no sodium salt for example. 
     "Recipes."  I kind of chuckled to myself when she suggested I use my recipes.  90% of what I cook is eyeballed, guessed, or experimentation:)  I do have some recipes, but unless I am baking bread or desserts, I usually just throw in the ingredients without measuring and hope for the best!  The fact that I have been cooking for more than a few years and the fact that I worked in a 4 star restaurant for over 7 years helps to insure that most of my meals turn out pretty darn good.
     For my first entry, I thought I would start with something simple...Ranch Dressing.  I love ranch with salads, bread, vegetables, and pizza.  I do not, however, like the fat content of it:(  Buying lowfat ranch dressing doesn't work either because it just tastes...wrong!  This is one thing that I eyeball EVERY time I make it, mostly because I like to change up the flavor a bit sometimes.  Sometimes I like a really peppery ranch, or a ranch that has so much garlic in it that a vampire would keel over just from looking at it.  Here is the basic "start" recipe which can be adjusted to your liking (this amount usually lasts me a week).

RANCH DRESSING
1/2 cup skim milk
1/2 cup light mayonnaise
1 TBL onion powder
1 TBL garlic powder
1 TBL black pepper
2 tsp low sodium or no sodium salt
(Optional ingredients)
1 TBL chili powder (cayenne or a Mexican blend of desired spiciness)
OR
1 pureed jalapeno (seeds removed)
OR
1/2 to 1 pureed avacado (amount depends on how much you want an avacado flavor)

Put all ingredients in a plastic or glass jar of suitable size and shake like crazy for about a minute.  Keep in refrigerator.  Enjoy!